

Pencil Pouch Tutorial
Materials:
Two fabrics—an inside and an outside fabric (unless you want the same fabric on both sides)
Heat n Bond
Thread (I suggest to use the same color as your outside fabric)
14 in zipper
Sewing machine
Scissors
Steam iron
Ruler or measuring tape
Needles or clips
Step 1: Measure and cut

This is the template I’ll be using for this tutorial. First, measure and cut out a 13 x 11.5 in rectangle out of both fabrics and the Heat N Bond. Before you move on, you’ll want to give your fabrics a good press to smooth out any wrinkles ahead of time.
Step 2: Heat N Bond
Place the Heat N Bond sheet over one of your fabrics (making sure the glue side is facing the back of the fabric) and follow the instructions on the Heat N Bond packaging to bond the glue to the fabric.
Once everything has cooled down, remove the Heat N Bond paper and place your other fabric over the dry glue. Again, make sure you’re placing the back of your fabric over the glue. Use your steam iron to bond the second fabric to the first fabric, making sure you go over the entire surface slowly and carefully.
Step 3: Add a margin and fold
Measure and label a ½ in margin all around your rectangle. Make sure you label your margin on the inside fabric and not the outside fabric. Now use your steam iron to help you fold down the edges of the 11.5 in sides. This is where we’ll be sewing the zipper.
Step 4: Measure and cut again
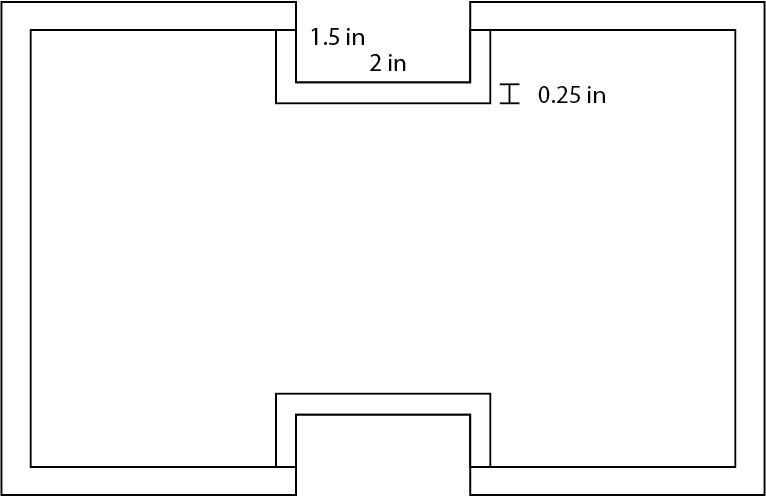
Measure and cut out a 1.5 x 2 in rectangle from either side of your fabric. Start by finding the midpoint and measure an inch on either side. Add a ¼ in margin around the rectangle and cut those pieces out.
Step 5: Add a zipper
If your zipper has any wrinkles, smooth them out with your steam iron first. Then, open the zipper and use needles or clips to hold the zipper in place for sewing. You can choose to sew as close to or as far from the zipper part as you want. I like to keep the edge of my fabric as close to the zipper as I can so I use a zipper foot with my sewing machine. If you don’t have a zipper foot, you can allow some room between the edge of the fabric and the zipper to accommodate the standard presser foot.
Remember to do a quick little back stitch when you first being sewing and right when you’re almost at the end to lock the thread in place. Do this for both sides of the zipper.
Step 6: Sew
Close the zipper about 1/3 of the way and turn the pouch so that the inside fabric is facing out. Sew up both sides of the pouch along the margin line you drew all the way up to the zipper.
Cut off the excess fabric around the edges of the pouch, leaving about a 1/4 in margin.
Take the pouch and fold it down so the edges of the cut out rectangle meet. Use needles or clips to hold it in place and sew along your margin line.
Cut off the excess fabric again, leaving about a 1/8 in margin.
Turn the pouch inside out again through the open zipper and press out the corners to give the pouch its full shape.
Now you can use your pouch to store your pencils or any kind of items you want! You can also add some flair to the zipper using ribbon or yarn or whatever you want.